We consider ourselves rather creative and wanted to play around with Adobe Acrobat's drawing tools to make the best annotations possible.
We found nothing offers quite as much freedom as a freehand drawing tool. We can make notes and highlight elements without any restrictions.
Find out how we achieved this editing freedom below.
How to Draw on Adobe Acrobat
Step 1: Open your PDF in Acrobat
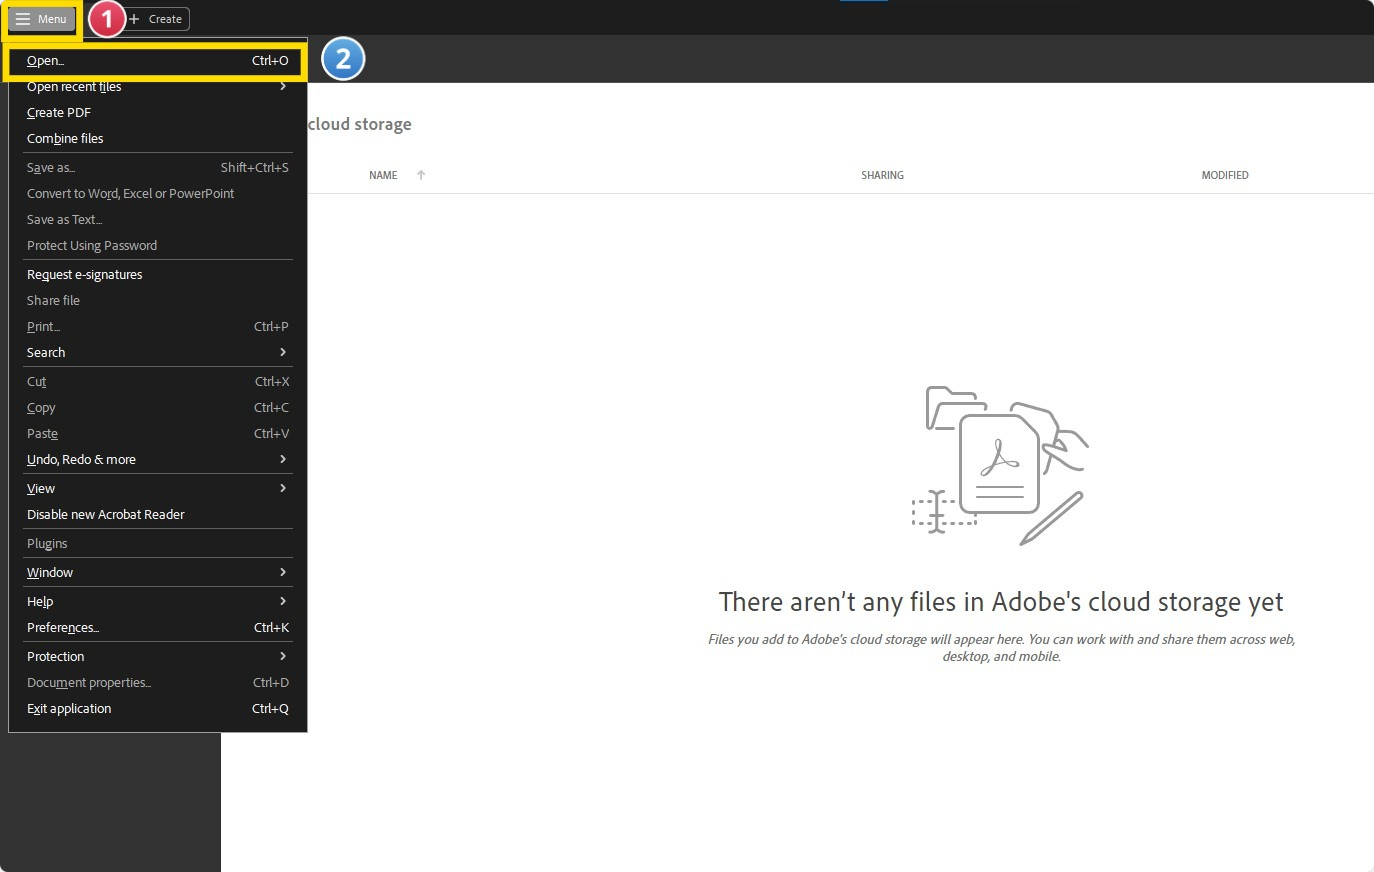
Launch Acrobat and navigate to "Menu" > "Open" to select and open the PDF file you wish to draw on.
Image source: Adobe Acrobat
Step 2: Activate the Draw Free Form Tool
In the toolbar, click on the "Draw" icon and activate the "Draw" tool.
Image source: Adobe Acrobat
Learn how to change the font size in Adobe Acrobat with our simple guide, enabling you to adjust text for better readability.
Step 3: Begin drawing on your PDF
Now, you can annotate your PDF freehand, adding notes and directions as needed.

Image source: Adobe Acrobat
Step 4: Save Your PDF
After you’ve finished drawing, don’t forget to save your PDF to ensure that all your drawings are retained. Go to the "Menu" in the top left corner of your screen and select "Save as..."

Image source: Adobe Acrobat

Discover how to add page numbers to Adobe Acrobat documents with our step-by-step tutorial, enhancing your document's organization and navigability.
How to Draw on Adobe Acrobat: Best Practices
To fully leverage drawing on PDFs, we delved deeper into Adobe Acrobat, moving beyond the basics to utilize its rich set of features for an improved editing workflow.
Leveraging Advanced Polygon Tools
We started incorporating the advanced polygon tools available in Adobe Acrobat. This allowed us to create precise, closed shapes, elevating our document markups with a higher level of detail than what we could achieve with just the basic pen tool.

Image source: Adobe Acrobat

Enhancing with Color Customization
Adobe Acrobat's feature-rich toolbar became a staple in our editing process, especially the color icon for markup customization. This enabled us to easily adjust the visual elements of our documents, making sure our annotations were both clear and visually compelling.

Image source: Adobe Acrobat
Securing Documents with Digital Signatures
We also tapped into Adobe Acrobat's digital signature capabilities to secure our documents. This feature not only protected the integrity of our content but also streamlined the review process, making it more efficient for everyone involved.
Learn how to erase text and images in Adobe Acrobat with our easy-to-follow guide, helping you clean up your PDFs efficiently.
Enhance Your PDF Annotating Experience
After exploring various options for drawing and annotating PDFs, we found ourselves gravitating towards PDF Reader Pro for several compelling reasons:
Intuitive Drawing and Annotation Tools
PDF Reader Pro offered us an intuitive set of drawing and annotation tools that perfectly balanced simplicity with functionality. The ease with which we could add detailed notes and creative drawings significantly enhanced our document workflows.
Advanced Features Without Complexity
One of the standout aspects of PDF Reader Pro was its ability to offer advanced features without overwhelming us with complexity. From polygon tools for precise shape creation to customizable color options for our annotations, everything we needed was just a few clicks away, presented in a user-friendly manner.
Streamlined Digital Signature Process
The streamlined process for adding digital signatures in PDF Reader Pro not only bolstered the security of our documents but also facilitated a more efficient review and approval workflow. This feature alone has saved us countless hours and added a layer of professionalism to our documents.
Comprehensive Yet Accessible
Choosing PDF Reader Pro allowed us access to a full suite of editing tools that catered to our diverse needs, from simple text edits to complex markup tasks. Despite its comprehensive feature set, we found the software to be surprisingly accessible, even for team members not as tech-savvy.


 Free Download
  Free Download


 Support Chat